Floor drain or shower channels: Which drainage system fits your needs?

Point or line drainage?
Nowadays, there are various options for drainage in the bathroom. Broadly speaking, a distinction is made between point and line drainage. Point and line drainage are two different types of drainage systems used in different applications. The main difference between the two is how the water is drained.
Point drainage refers to a method of drainage in which water is discharged at a specific point in the floor. This is usually accomplished by a floor drain that takes the water from the shower, bathtub or sink and discharges it directly into the drain lines. A point drainage system can be very effective because all of the water is discharged at a specific point. However, it can also be problematic if the drain becomes clogged or blocked, which can lead to flooding and water damage.
Line drainage, on the other hand, refers to a method of drainage in which water is discharged along a line or gutter. Line drainage is usually achieved through a shower channel that directs water along a narrow groove or gutter into a drainage pipe. A line drainage system can be very effective because it drains water quickly and efficiently while covering a wider cover and larger area. It is also less prone to clogging or blockages because the water is drained along a wider area.
Overall, point and line drainage systems are different methods of draining water in bathrooms, showers and other applications. Choosing between the two depends on specific needs and requirements, including installation location, type of floor, and desired drainage performance.
Floor drain

A bathroom floor drain is an important component in effectively draining water to prevent mold and other moisture problems. The floor drain is usually installed in the shower or bathtub area to allow water to drain away.
There are several types of floor drains that vary in design, size and performance. Some drains are shallow and unobtrusive, while others have multiple drain holes and a higher drainage volume. An important consideration when installing a bathroom floor drain is proper positioning to ensure effective water drainage. A drain that is too low or too high can interfere with water drainage or even cause problems.
To ensure that the floor drain works properly and stays clean, it is important to clean it regularly. Dust and hair can build up in the drain opening and block the flow of water. Regular cleaning can prevent this problem.
Overall, the bathroom floor drain is an important component in preventing moisture problems and keeping the bathroom dry and clean. It is advisable to consult a professional to find the right type and positioning of the floor drain.
Floor drain system in our assortment
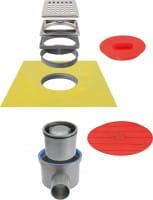
We offer the floor drain system in the form of individual components or as a complete set. Our prefabricated Floor drain complete set is used for precise surface drainage and is installed wherever floor coverings additionally require a standard-compliant floor drain due to their moisture load. Usually, the floor drains are intended for indoor use. They are used, for example, in bathrooms and showers, public toilets and changing areas, washrooms, various workrooms and basements, workshops, storerooms and warehouses. If used outdoors, the customer must ensure that the water drainage volume is adapted to drain and that there is no risk of the drain housing freezing.
The complete floor drain system consists of 3 different modules, which differ as follows:
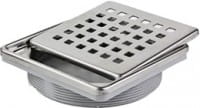
Module 1 Grate + thread adapter - Our grate and thread adapter selection represents the first module of our floor drain system. Each variation is available in the dimensions 10 x 10 cm and alternatively always as 15 x 15 cm version. All grates are made of solid material stainless steel. The grates are available in the three variants "linear", "square" & "sun".
Module 2 sealing flange - This is the second module of our floor drain system. You can choose between the variant with foil sealing (the same material as our sealing mats) and alternatively the version whose sealing is based on a mesh (glass fiber fabric). The variant with the foil sealing can be used in connection with a sealing tape or a brush sealing. The mesh variant can only be used in combination with a brush seal. Both variants are inseparably bonded to the PP flange ring by adhesion and are watertight.
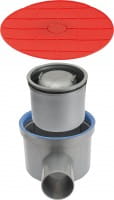
Module 3 drain body with siphon - The third and last module of our floor drain system is about the drain body. Here we present our drain body with siphon and construction protection cover. The one has an installation height of only 63 mm and a horizontal drain with a barrier water height of 3 cm. The larger version has an installation height of 93 mm and a barrier water height of 5 cm. All including odor trap system and red construction protection covers. We would like to draw your attention to the fact that these drains are not compatible with our line drainage systems.
Processing
- Before installation, the floor drain from module 3 must first be connected to the sealing variant from module 2.
- The floor drain and the waterproofing are firmly connected when the waterproofing cannot be tightened any further.
- For easier installation in the course of further installation, the protruding sealing foil or the glass fiber fabric must be folded up and laid on top.
- In accordance with the drainage point specified by the customer, the drain system is aligned at the appropriate height, taking into account a necessary covering slope of approx. 1-2 %, and fixed to the substrate with cement or screed mortar.
- Care must be taken to ensure that the drain housing is aligned horizontally.
- If quick-setting mortar is used, the outlet pipe of the drain pot can be connected to the house drainage pipe by means of a push-in sleeve after a short curing time.
- The drainage gradient between the drain and the house drainage pipe should be at least 0.5 %.
- After completion of the installation work, a leakage check must be carried out with water to check the tightness of the connections and the correct drainage behavior.
- To prevent blockages of the drainage system due to dirt and mortar, the smaller of the two red construction protection covers must then be put in place. If necessary, suitable sound insulation measures must be taken in the area of the floor drain/drainage pipe to avoid disturbing sound bridges.
- After completion of the installation work, a watertight connection must be made with module 2 as part of the composite sealing to be carried out.
- When using the foil variant, the yellow sealing foil is bonded to the screed over the entire surface and free of bubbles using flexible mortar with a 4 mm comb notch.
- The subsequent composite sealing, e.g. with sealing foils, is carried out in a width of approx. 8-10 cm overlapping and watertight with sealing tape.
- If a brushable composite waterproofing is used, the mesh is embedded level between the first and second waterproofing layers. The same procedure can also be carried out alternatively with the foil variant.
- In the course of the subsequent tiling, the building protection cover is first removed again and then module 1 is screwed to module 2.
- For this purpose, the thread adapter of module 1 is screwed into the flange ring of module 2. Then the plastic frame is screwed onto the threaded adapter (both module 1) and aligned to the height of the upper edge of the tile covering.
- The stainless steel grating frame is then placed over the plastic frame and the stainless steel grating cover is placed on top of it.
- When aligning the height of the plastic frame, the material thickness of the stainless steel frame of 7-17 mm must also be taken into account so that the tile covering is flush with the surface of the stainless steel frame.
- Before inserting the stainless steel grating cover, the odor trap (siphon) must be inserted to ensure full functionality of the drain pan.
- The connection joint between the stainless steel frame and the adjacent tiled covering must be approx. 5 mm wide and sealed with an elastic joint material (e.g. MS polymer rubber).
Shower channels

Shower channels are a modern and popular way of drainage in bathrooms and showers. Unlike the traditional floor drain, the shower channel is a narrow, elongated drain installed along the wall or in the center of the shower.
Shower channels have many advantages over traditional floor drains. They are more visually appealing and can improve the design and aesthetics of the shower. Because they are elongated and flat, they blend seamlessly into the floor and can provide barrier-free access to the shower. Another benefit of shower channels is their higher drainage capacity. They can drain larger amounts of water in less time than traditional floor drains. This can reduce the risk of water damage and mold growth. When installing shower channels, proper planning and positioning is important to ensure optimal drainage performance. It is advisable to consult a professional to find the right type and size of shower channel, as well as the correct positioning.
In summary, shower channels offer a modern and elegant way of drainage in showers and bathrooms. They offer greater drainage performance, are more visually appealing, and can make access to the shower easier.
Shower channels in our assortment
We offer shower channels in various complete sets. Whether for the wall drain or in the middle of the shower, a wide selection awaits you.
DURAL Shower channels complete set
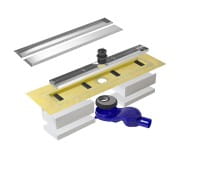
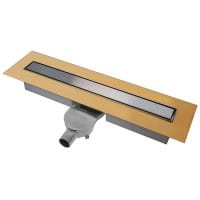
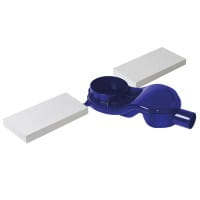
Our prefabricated DURAL shower channel set offers an elegant solution in the field of shower channel systems. Typically, the shower channels are designed for floor-level showers. The height-adjustable channel body makes this system suitable for floor covering thicknesses of 6 - 21 mm. The "Doubleface" grate can be used both as a panel and as a tile trough. Alternatively, you can choose our "square" grate with square patterns. In addition, the system consists of a closure / installation socket, spacers for height adjustment, a sealing flange and drainage tray, as well as EPS mounting blocks and a connector drain. This set can be used to lay standard tiles, mosaics and also natural stones.
Processing
- First of all, please check the contents of the box for completeness.
- Cut out the screed in the area of the shower to fit.
- Place the channel and set it up to the required height with tile adhesive. Please ensure that the channel body is level both horizontally and vertically.
- Connect the drain with the drainage and check the system for tightness.
- Then shim the drain and work the screed with 2% slope towards the gutter.
- The channel is pre-assembled for a construction height of 11 mm, suitable for tile thicknesses of 8 - 10.5 mm. If a different height is required, for example when laying mosaic or natural stone, the height can be adjusted from 6 to 21 mm. To do this, remove the grate and unscrew the channel trough using the assembly aid. To reduce the installation height, use the four factory-placed 9 mm spacer plates (included in the delivery) in the necessary number. The different structure of the upper and lower side of the plates ensures a tight fit. The distance between the spacer plates should be at least 5 cm to the left and right of the drain opening.
- After sufficient drying time of the screed, properly work the pipe collar firmly connected to the shower channel into the waterproofing system and apply the tile covering. if necessary, adjust the height beforehand.
- Then reattach the channel body and grate.
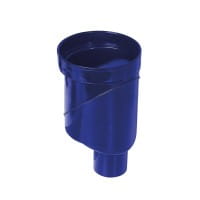
We also offer two additional drains to the shower channel complete set. Performance-drain horizontal DN50 convinces with a higher drainage capacity and greater barrier water height than the standarddrain. If you do not want a horizontal drain, we recommend our drain vertical DN50.

