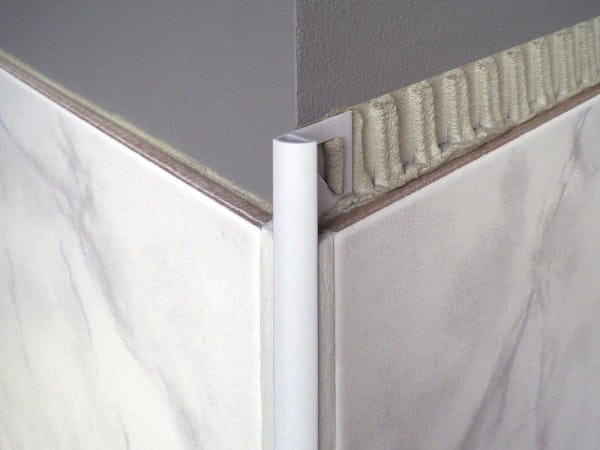
Tile rails provide the optimal protection for tile edges and at the same time act as a visual highlight. The assortment is large. We offer the different types of tile rails, such as angle, square or quarter-circle profiles, in several colors, heights, lengths and surfaces. Of course, you can also choose the material with us. From inexpensive PVC to robust stainless steel, everything is available in our store.
Due to the many design options, they are now also used for decorative purposes and can often be found in the bathroom or kitchen.
When to lay tile rails?
You want or are in the process of renovating your house or bathroom / kitchen, etc., or even build new? Perfect, then you certainly meet the first time the term tile rails. Tile rails are always popular in combination with tiles, but can also harmonize well with other floor coverings.
In combination with tiles, the tile rails are placed at the ends of the tile course either with mortar or tile adhesive. The installation of the tile rails is part of the actual tile installation and is done in the same operation, if edge tiles are to be set. Since the tile profiles are pushed under the tiles to a small extent (the fixing leg), it is important to ensure that the tile rails are not attached when the edges of the tiled areas have already dried. Otherwise, the profiles may not be flush with the tile covering, creating an unsightly area that not only disturbs the overall appearance, but will most likely not hold up in the long run. Subsequent installation of tile profiles is possible, but also very costly. What you need to consider there, you can read in our NEWS article "Laying tile rails retroactively - is that possible?".
What to consider when choosing tile rails?
When laying tile profiles, the correctly selected height is the be-all and end-all, so the appropriate height should be determined in advance. Is the height of the profile not the same as the tile thickness? It would be nice, but in most cases it is not. Normally it is said that it is advisable to buy tile profiles always 1 - 2 mm higher than the tile thickness of the tiles to be laid. When measuring, precise procedure is advantageous, so that the rail is not chosen too small or too large in the end, and thus no harmonious final result can be achieved.
However, attention should always be paid to the manufacturer's specifications. As is often the case, opinions differ as to the correct size.
1. the right preparation
From the actual laying it is necessary to determine how many tile borders are needed. Proper and correct measuring is particularly important here so that no delays occur during laying, for example, because there is too little material. It is best to always allow for 10% more waste. Tile profiles are usually available in 250 cm length, we also have rails in 100 cm and 300 cm in our assortment. If shorter pieces are necessary, there are different possibilities with which you can shorten the rail accordingly. With a crosscut saw you will usually achieve an optimal result. If you do not have one, a hand saw with a stainless steel blade or an angle grinder can also be used.
2. set tile rail The next step is to insert the rails precisely in the appropriate place. Fixing is done with a tile adhesive or mortar. It is important that excess mortar should be removed immediately after inserting the tile rails before the adhesive sets and adheres to the new profiles. Once set, cleaning is not as easy and damage to the tile rails can occur.
3. follow-up Tile rails, just like tiles, need time to dry and become solid at the tile edges. This takes about 24 hours.
Once again quickly summarized for you, a laying guide of tile profiles in 5 steps:
- Always select tile profiles 1 - 2 mm higher than the tiles you want to install.
- Apply tile adhesive with a notched trowel.
- Press the tile profile into the adhesive bed and align it.
- Press tiles firmly into place and align so that a gap of 1 - 5 mm (depending on your preference) is left to the profile.
- Completely fill the space between the tiles and the profile with grout.
Lay it yourself or call in a professional?
You have to decide for yourself. Are you a skilled craftsman and do you dare to lay tiles? yes? Then the installation of tile profiles should not be witchcraft for you. Just keep in mind that a really clean job is required. In the best case, the result should still look flawless years later and, of course, please yourself. Small mistakes are then not only annoying, but can also be expensive.
We hope that we have been able to help you a little further.
Notes:
In general, the generally accepted rules of technology must be observed!
The following applies to all products/materials: The usability with regard to mechanical and chemical loads must be carefully checked in each individual case before installation.
If you have any questions, please do not hesitate to contact us.
We wish you success
the team of alleszumfliesen.de

